

How to set up a cold wallet is a question that’s more important today than it ever was. While the average joe may not even know what a cold wallet is you are finding out how to set one up which means you’re moving in the right direction with securing your crypto assets. In the crypto and NFT space security is essential.
A couple of months ago I had just sold an NFT for 2eth (worth $6000 at the time) and thought I was pretty lucky. I was getting ready for bed and planning what I wanted to do with the money once I got it converted to USD. When I woke up the next morning I was horrified to find my wallet was drained completely of all the ETH and NFTs I had.
After that experience, I learned 2 things, having a cold wallet you can send stuff to for holding is essential and you can easily get scammed or hacked due to things that are not your fault. One of the most famous hacking groups in the entire crypto-sphere known as the Lazarus group was able to steal $620 million in the cryptocurrency Ethereum just this year.
In a separate scam by another set of hackers, those hackers were able to skim bitcoins from customer accounts stealing over 740,000 bitcoin (approximately 31 billion dollars today) over a number of years. All without the customers having any idea and without any fault of their own.
The most common way to improve your crypto security with little cost is to have a cold storage wallet. A hardware wallet or cold storage device is a type of cryptocurrency wallet that stores your private keys in a physical device that you can keep with you and is not connected to the internet.
Cold wallets work to keep your crypto and other assets like NFTs protected by storing the private keys to access your wallet, keeping them offline so they are not vulnerable to hacking. Whenever you need to access your coins and digital assets you can safely unlock your cold wallet and interact with them through the wallet’s interface.
With that said, in this post, you will learn how to set up a cold wallet in 7 easy steps, as follows:
- Establish a connection with the wallet software
- Install the latest Firmware
- Create a new wallet
- Create a Backup
- Name Your device
- Set up a Pin
- Activate coins
How to set up a cold wallet

Cold storage devices are usually compatible with Windows 10 and newer, macOS 10.11 and higher, Linux, and Android OS with OTG support. For more info on if your cold wallet is compatible with your PC check out the company’s website.
Be sure to buy any cold wallet from the official retailer. There’s a very common scam where cold wallets that are preloaded with viruses pose as original but in reality, they are cheap or second-hand hardware wallets.
When you receive your cold wallet package, inspect the package to ensure it is sealed and shows no sign of tampering. Unofficial retailers selling compromised wallets are more common than you might think. Scammers know that you will be using the hardware wallet to store your most valuable assets.
This creates an opportunity for them to target the vulnerability in second-hand sales of cold wallets. Most cold wallet websites warn of phishing websites posing as them or their team. No reputable official vendors will ever ask you for your seed phrase or any other private information about your hardware wallets.
Step one: Connect with the wallet provider
Some wallet providers like Trezor, have multiple ways to allow your cold wallet to communicate with their wallet software. You have the option to download the Trezor suite software or use their website software in order to set up your wallet. There is also the option of installing Trezor Bridge to allow your Trezor device to communicate smoothly with the Trezor Wallet website.
Visit your cold wallet provider’s website to determine what they recommend as the most optimized solution that is compatible with whatever browser you use. Trezor is a popular and trusted cold wallet, should you choose to go this route, when you go to the Trezor Wallet website, you will see a page with a download link. Download Trezor bridge and follow the instructions on the screen.
Step two: Install the latest Firmware
Wallet providers do not install firmware on your cold wallet before shipping it. If your device came with the firmware already preinstalled, do not use it, and contact the company’s support immediately! The first thing you will be asked to do once connected to a cold Wallet is to install the device system – firmware.
This is done to ensure that the latest firmware is in place when initializing a new device. Leaving this step to you also enables you to check the legitimacy of the firmware.
To install the firmware on your device plug in your device and go to the Wallet website or desktop app. Most companies recommend plugging the device directly into your computer instead of using a USB hub. When you have successfully established the connection between your device and the Wallet you should see a screen prompting you to install the latest firmware.
On your device, simply click on . Once the installation is finished you should see a screen informing you that it is completed. Unplug and re-plug your device and continue to the next step.
Step three: Create a new wallet
After the firmware is installed successfully, unplug and re-plug your device and you will be greeted by a welcome page on the application you are using. When you select to create a new wallet, a screen should show up on your device prompting you to choose to create the wallet.
Simply click on . Once you create a new wallet, you are pretty much ready to use it. Although the cold wallet is ready to be used now I recommend you continue with the entire setup process. This is to ensure the maximum safety of your device.
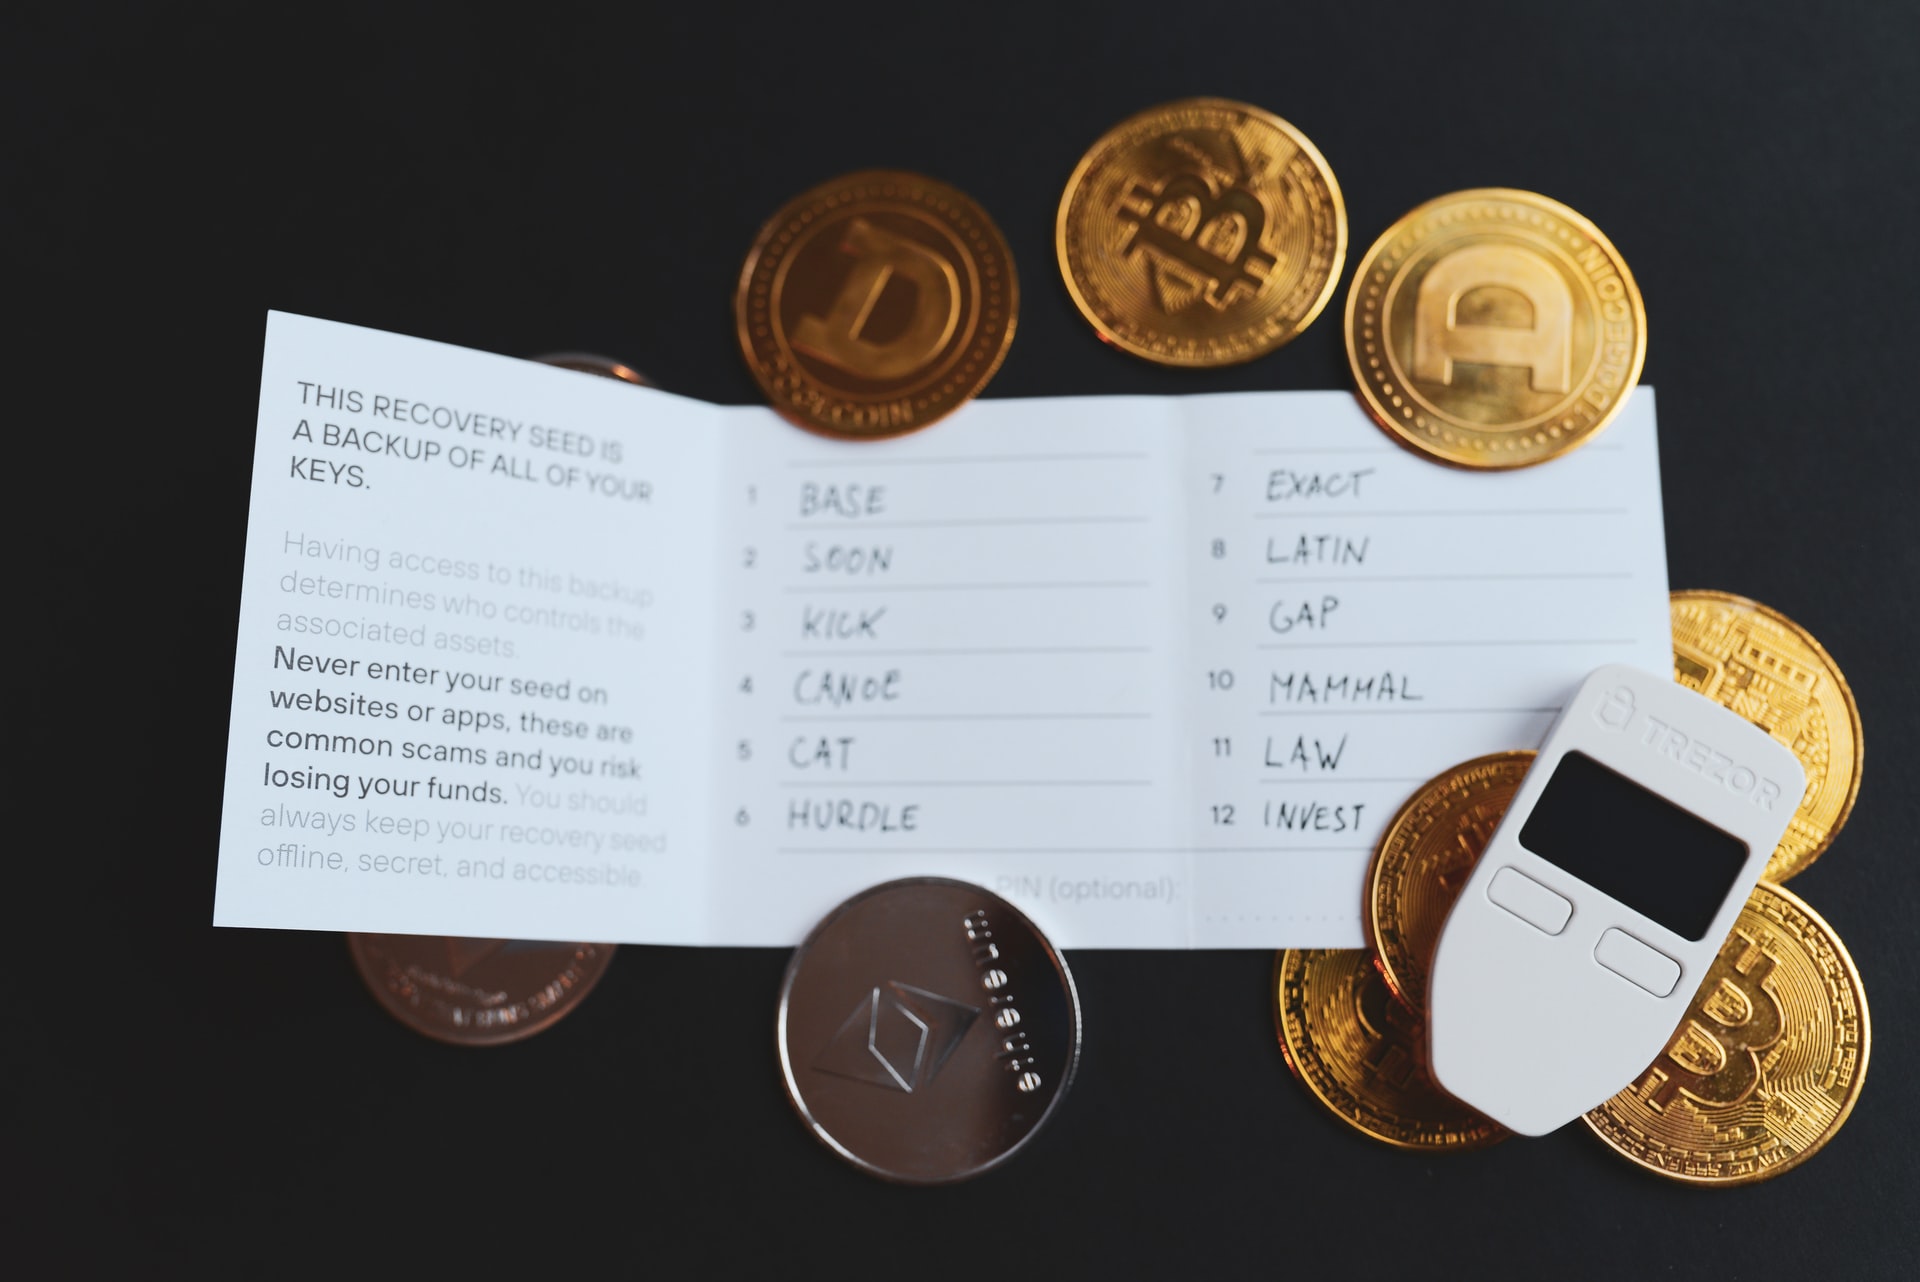
Step four: Create a Backup
After creating a new wallet the next step is to click on create a backup and prepare to write down your recovery seed on the specially designed cards included in the package you received. You will be presented with a random set of English words, each displayed on the screen of your device.
Note that the words for the seed phrase will only be presented to you twice in a row and then never again. It is not possible to get to the seed or have the device display the words ever again. Pay close attention to every word and make sure you write it down correctly and in the right order.
Push the right button on your device to see the next word of your recovery seed. Carefully write down the words in the exact order they are presented. Once all of the words are recorded in the recovery card, your device will display the 12 or 24-word recovery seed again so you can verify the correct order and spelling.
Step five: Name your device
This is not a mandatory step but giving your device a unique name to make it distinguishable will help you quickly identify your device and make it easier to select it in the dashboard, especially if you use multiple devices. The maximum length of the name is 16 characters on some devices.
Step six: How to set up a cold wallet pin
A PIN protects your device against unauthorized physical access. After you create your backup it is recommended to set up PIN protection as soon as you initialize your device.
Enter your PIN by clicking on an obscured numerical pad that should be presented. The layout revealing the position of the numbers is displayed on your cold wallet device. Every time you are prompted to enter the PIN the layout changes. Recommended PIN length on the popular Trezor device is four to six digits without repeating digits. The maximum PIN length is nine digits.
Step seven: Activate Coins
At this point your wallet is set up, your new wallet is created, your device has a new name and you set up your pin. All that’s left to do is to activate which coins you want to show up on your Trezor suite home screen dashboard. Simply click on the coin of your choice to select it and click on it again to unselect.
If you are using the web wallet software create a bookmark in your browser to enable easy access to the wallet interface. This is so that you will be able to avoid unnecessary googling and distractions trying to get you to a fraudulent site. The fewer opportunities scammers have to trick you the better.
Your cold wallet is now set up and ready to use, congratulations! For more info regarding your cold wallet check out How do crypto hardware wallets work and are you actually safe?
The Review
macOS Sierra
A wonderful serenity has taken possession of my entire soul, like these sweet mornings of spring which I enjoy with my whole heart. I am alone, and feel the charm of existence in this spot, which was created for the bliss of souls like mine.
PROS
- Good low light camera
- Water resistant
- Double the internal capacity
CONS
- Lacks clear upgrades
- Same design used for last three phones
- Battery life unimpressive
